CHAPTER FIVE
Wirework Techniques
All wirework jewelry grows from the mastery of the basic techniques in this chapter. Learning the basics will allow you to make your own earrings almost immediately. With practice, you’ll use these techniques to make links and drops and to embellish basic wirework jewelry. Mastering these skills and learning some basic metalworking techniques will enable you to make your own clasps and components, and to create intricate wire designs. Take time to learn the basics by practicing with copper or other base metal wires.
TECHNIQUE
Simple Loop
Making simple loops is a fundamental wirework technique. This method is the most basic skill for making earrings and connecting pieces of wire together.
To make a simply stacked dangle or a basic earring, begin by selecting a head pin in the length that best accommodates the beads and a wire gauge that best matches the bead hole sizes.
Tech Tip
If the hole in the bottom bead of the design is too large to stay on the head pin, add a spacer bead or small round bead to the head pin before adding the rest of the beads.
INSTRUCTIONS
- 1. Stack the bead(s) on a head pin.

- 2. Use chain nose pliers to bend the head pin against the top bead at a right angle.
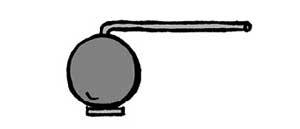
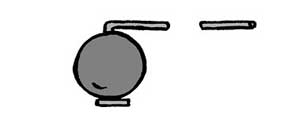
- 3. Use wire cutters to snip the head pin down to 1⁄4 to 1⁄2 inch, depending on how large you want the loop.
- 4. Grasp the very tip of the head pin with the round nose pliers (A). Roll the wire into a circle by rotating the pliers (B).
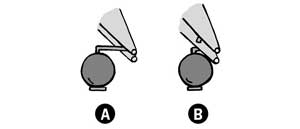
- 5. To complete the loop, readjust the tool’s grip on the wire. Make sure to grasp the wire at the same point with the barrel of the pliers.

- 6. Now the loop is complete.

Tech Tip
To open the simple loop for attaching an ear wire or chain, do not unroll the loop. Grasp the open side of the loop with chain nose pliers and bend it away from the base wire. To close the loop, simply reverse this action by bringing the end of the loop back to the base wire. This will prevent misshaping the loop.
TECHNIQUE
Wire-Wrapped Loop
Wire-wrapped loops are more secure than simple loops. Mastering this technique can take practice, but it is an essential wireworking technique. Wire-wrapped loops can be used for making earrings or for connecting pieces of wire and beads.
When making a basic earring or simply stacked dangle, begin by selecting a head pin in the length that best accommodates the beads. Next, choose the wire gauge that best matches the bead hole sizes.
INSTRUCTIONS
- 1. Use chain nose pliers to grasp the wire above the stacked beads.

- 2. Leave a small gap above the top bead and use the same pliers to bend the wire at a 90-degree angle.

- 3. Switch to round nose pliers. Hold them so the barrels are vertical, and grasp the wire at the bend. Bend the wire up and over the top barrel of the pliers to form half of the loop. The top barrel of the pliers is now inside the loop.
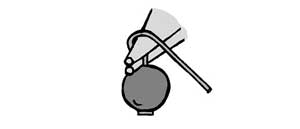
- 4. Remove the pliers and move the half loop onto the bottom barrel of the tool. Keep bending the wire around the bottom barrel of the tool to complete the loop. Then let go of the loop.
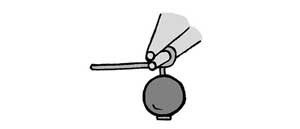
- 5. Hold the loop flat with chain nose pliers. Do not insert the jaw back into the loop.
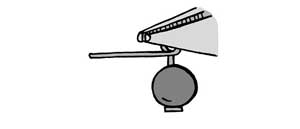
- 6. Use your fingers to wrap the wire tail tightly around the base wire, creating neat stacks. Make sure to start just below the loop and wrap downward toward the beads.

- 7. Use wire cutters to clip the excess wire carefully, and use chain nose pliers to push the clipped end into the coil.

Tech Tip
If you are attaching a chain or another loop, slip it on at step 4, before you complete the loops.
TECHNIQUE
Wire-Wrapped Bead Cap
Wire-wrapped bead caps are a simple way to add a finished look to bead dangles or pendants. To make a simple pendant, begin by selecting a head pin or piece of wire in the length that best accommodates the beads. Next, choose the wire gauge that best matches the bead hole sizes. Complete steps 1 through 4 of the wire-wrapped loop technique, and then continue with the following steps.
INSTRUCTIONS
- 1. Grasp the loop from the side with chain nose pliers. Do not insert the jaw back into the loop.
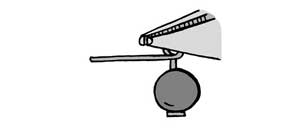
- 2. Wrap the wire tail tightly around the base wire one full revolution.

- 3. Continue to wrap down to the top of the bead in tight, concentric coils. Wrap so the coil lies neatly against the bead.
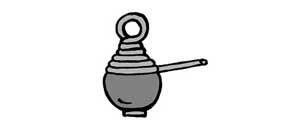
- 4. Use wire cutters to clip the excess wire carefully.

TECHNIQUE
Wire-Wrapped Link with Beads
Wire-wrapped links with beads can be used as elements in a jewelry design or linked together to make a chain. Individual links are added into a design as they are being made.
INSTRUCTIONS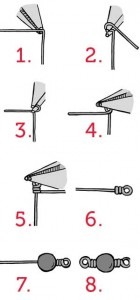
- 1. Cut a piece of wire approximately 4 inches longer than the bead. Begin by grasping the wire 11⁄2 inches from one end with chain nose pliers. Bend the wire at a right angle.
- 2. Holding round nose pliers so the barrels are vertical, grasp the wire at the bend. Use your fingers to bend the wire up and over the top barrel of the pliers to form half of the loop. The top barrel of the pliers is now inside the loop.
- 3. Remove the pliers and move the half loop onto the bottom barrel of the tool. Keep bending the wire around the bottom barrel of the tool to complete the loop. Then let go of the loop.
- 4. Hold the loop flat using chain nose pliers. Do not insert the jaw back into the loop.
- 5. Wrap the wire tail tightly around the base wire. Wrap so the coil creates neat stacks. Make sure to start just below the loop and wrap downward.
- 6. Once you have finished wrapping, use wire cutters to carefully clip the excess wire close to the last coil of the wrap; then use flat nose pliers to push this clipped end into the wrap.
- 7. Turn the wire upright and string the bead onto the tail.
- 8. Create a second wire-wrapped loop of the wire, again pushing the clipped end into the wrap. The link is now complete.
TECHNIQUE
Wire-Wrapped Link Chain
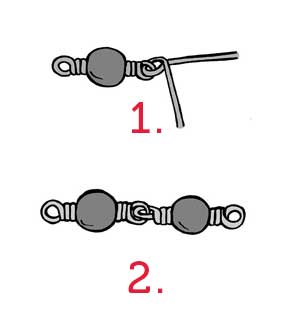
To make a wire-wrapped link chain, begin by making your first link using the wire-wrapped link technique. Start your second link by completing steps 1 through 3 of the wire-wrapped link technique, then proceed with the directions below.
- Slip the unwrapped loop into a finished loop of your completed link.
- Return to steps 4 through 8 of the wire-wrapped link technique to create a second finished link. Continue by making and adding additional links until the desired length of wire-wrapped link chain is complete.
TECHNIQUE
Briolette Wrap
The briolette wrap technique may be used with any top-drilled bead or briolette to create a drop, charm, or pendant. It can also be used to create a bail to suspend a donut-shaped bead. A bail (sometimes spelled bale) is a jewelry-making component designed to attach a pendant or stone to a necklace. Bails are either ready-made metal components that are glued to a pendant or stone or handcrafted wire components that are wrapped onto a pendant or stone. In all cases, the chain or stringing material passes through the loop at the top of the bail so that the pendant or stone can hang from the necklace, usually in the center front.
The briolette wrap is an important wireworking skill to master. To make a simple briolette drop, begin by selecting a wire in the gauge that best matches the bead hole.
INSTRUCTIONS
- 1. Cut a piece of wire approximately 4 inches longer than the width of the briolette drill hole. With teardrop briolettes, the width of the drill hole is quite short, but with flat, pear-shaped briolettes, the width of the drill hole will be longer. When you are first learning to make briolette wraps, a longer piece of wire is easier to work with. String the briolette onto the wire so that one side of the wire is shorter and one side is longer as shown. Bend both sides of the wire up along the tip of the briolette. Cross one side of the wire over the other, across the tip of the briolette.
- 2. Use chain nose pliers to bend the longer, front-facing wire about 45 degrees, so that it points straight up from the tip of the briolette. This wire is now the base wire.
- 3. Begin to wrap the shorter, rear-facing wire around the base wire.
- 4. Continue to wrap this wire around the base wire one full rotation.
- 5. Use wire cutters to clip off the remainder of the wrapping wire.
- 6. Make a wire-wrapped loop with the remaining base wire.
Covering a Briolette
For a more decorative look or for making briolette pendants, try covering the top of a briolette with wire. Complete steps 1 through 4 of the briolette wrap technique. When covering a briolette with wire, you will need to start with a longer piece of wire. The length of your wire depends on the size of the briolette and how many wraps you will be making.
INSTRUCTIONS
- 1. Instead of cutting the excess wire in step 5 of the briolette wrap technique, continue to wrap the wire around the base wire and down to the top of the briolette in concentric coils.
- 2. For a neatly wrapped bead cap, make sure each coil of wire lies neatly against the wire from the previous row.
- 3. Use wire cutters to clip the excess wrapped wire. Gently tuck the end of the wire into the last wrap with chain nose pliers.
TECHNIQUE
Making Basic Ear Wires
Making ear wires is a wonderful way to make personalized earrings.
INSTRUCTIONS
- 1. Begin by cutting a 3-inch piece of wire. Make a simple loop.
- 2. Holding the loop with chain nose pliers, use your fingers to bend the wire up and over the small end of a ring mandrel to create the ear wire.
- 3. With the chain nose pliers, grip the end of the wire and bend it up slightly.
- 4. Cut the end of the wire and file it smooth. Repeat to make the second ear wire.
Tech Tip
To make identically sized ear wires, mark the ring mandrel with a piece of tape. This will ensure that the wire is bent in the same place for both ear wires.
TECHNIQUE
Making Head Pins and Eye Pins
Head pins and eye pins are essential jewelry-making components used for stacking and dangling beads. The “head” or the “eye” of the pin prevents the beads from falling off the end of the wire. Head pins and eye pins are often used to make simple earrings or to dangle beads from a chain.
Head pins and eye pins can be purchased ready-made, or you can make your own. Begin by selecting a gauge that works with the size of the beads and a wire material that works with the other metals being used in the project.
BASIC HEAD PIN
To make a basic head pin, cut a length of wire and use flat nose pliers to make a tiny bend at the tip of the wire. Pinch this bend tightly against the base wire of the head pin.
PADDLE-STYLE HEAD PIN
To make a paddle-style head pin, use a mallet and a bench block to hammer the end of the wire instead of bending it. The flattened, widened tip will prevent beads from falling off the end of the wire.
SPIRAL-STYLE HEAD PIN
To make a spiral-style head pin, start by making a basic head pin. Grip the bent tip of the wire with chain nose pliers and coil the base wire. The size of the spiral will depend on design, the size of the bead holes, or how decorative you want the head pin to be.
BASIC EYE PIN
To make a basic eye pin, cut a length of wire and use round nose pliers to make a simple loop at the tip of the wire.
TECHNIQUE
Making Hoop Earrings
Beading hoops are a common jewelry-making component used primarily for making hoop earrings. They are also used for making wine stem charms. Beading hoops can be purchased ready-made, or they can be made in a variety of metals, sizes, and gauges.
Basic 2-Inch Beading Hoops
INSTRUCTIONS
- 1. Decide on the diameter of your finished beading hoop. (The diameter is the measurement across the width of the hoop at its fullest point.) Cut a length of wire four times this measurement. For example, a 2-inch hoop will require 8 inches of wire. Wrap the wire one complete revolution around a mandrel, spool, or another cylindrical object that is the same diameter as the desired finished hoop.
- 2. Remove the wire from the mandrel. Prepare to make the closure by cutting the ends of the wire so they overlap by 1⁄4 inch.
- 3. Make a simple loop at one end of the wire.
- 4. Use chain nose pliers to bend 1⁄4 inch of the free end of the hoop at a 90-degree angle. (If using ready-made hoops, start here.)
- 5. To close the hoop, hook the bent end of the hoop into the loop end.
Embellishing Hoop Earrings
After purchasing or making basic hoops (see above), embellish them with beads or charms for added interest.
String beads, charms, or dangles onto the free end of the hoop before bending the end to make the hook.
String small beads or roundels on fine gauge wire and carefully position and wrap the small beads around the wire of the hoop.
TECHNIQUE
Working with Cones
This technique is essential for completing multistrand necklaces with a finished look that hides knots, crimp beads, or bead tips.
INSTRUCTIONS
- 1. Cut 3 inches of wire and make a wire-wrapped loop. The size of this loop depends on the number of strands that will be attached and the size of the cone. For a two- or three-strand project, a small loop is sufficient. For four or more strands, a larger loop is preferable.
- 2. Individually crimp each strand of beads to the loop. Use one crimp per strand.
- 3. String the cone onto the wire and over the wire-wrapped loop and crimped bead strands.
- 4. String a small bead onto the wire and start another wire wrap. String one side of the clasp onto the loop and finish the wire wrap. Repeat on the other end with the remaining side of the clasp.
Tech Tip
If you are using nylon or silk, use bead tips instead of crimps to attach the strands to the loop.
TECHNIQUE
Finishing Memory Wire
Memory wire is a unique type of wire, perfect for making necklaces, bracelets, anklets, and rings. The wire is spring-tempered steel, so it always springs back to its original coil form. Memory wire comes raw or as plated silver, gold, or brass steel.
Because memory wire is made from steel, it can be hard to manipulate. Using good tools and proper technique makes memory wire easier to work with. Two methods are used to finish memory wire.
Method #1
INSTRUCTIONS
- 1. Dab a drop of super glue on one end of the memory wire and insert it into a half-drilled memory wire end cap.
- 2. String the beads and glue a second memory wire end cap to the other end of the memory wire.
Method #2
INSTRUCTIONS
- 1. Use round nose pliers to roll the very end of the memory wire into a simple loop.
- 2. String the beads and finish the other end of the memory wire by making a second loop.
- 3. Embellish the loop ends of the memory wire jewelry by adding a dangle or charm.
Tech Tip
Begin any project by cutting the desired number of coils of memory wire using memory wire cutters. Using regular wire cutters or nippers on memory wire can damage the blades. Always use cutters specially designed for cutting memory wire.
TECHNIQUE
How to Open and Close Jump Rings
Many pieces of strung jewelry use jump ring to connect the clasp or to add charms or pendants. It is important to properly open and close jump rings when adding a clasp or charm. This ensures the long-term integrity of the jump ring.
INSTRUCTIONS
- 1. Grasp the jump ring from one side with flat nose pliers.
- 2. Using your fingers or another pair of flat nose pliers, push one side of the loop away from the other.
- 3. Do not pull the loop apart, as this motion will eventually break the wire. Your open jump ring should look like this from the side.
- 4. Slip on a chain, charm, or finding. Use the same method to close the jump ring. Wiggle the ends of the ring or loop back and forth to close any gap.
TECHNIQUE
How to Use Split Ring Pliers
Split ring pliers are a very specialized tool used exclusively to open split rings without stretching them out or damaging them. A split ring is a continuous double circle of wire coiled like a key ring. Split rings are sturdier than jump rings and are not likely to open accidentally. The split ring plier is a very handy tool for opening and holding split rings open.
INSTRUCTIONS
- 1. Place the tip of the curved part of the jaw of the split ring pliers between the layers of the coil, near one of the ends. Squeeze down on the tool to open the coil.
- 2. While holding the split ring open, slip a chain, charm, or clasp onto the end of the coil.
- 3. Remove the split ring pliers. Slide the chain, charm, or clasp around the coil until it moves freely around both coils of the split ring.
TECHNIQUE
How to Use Wire Cutters
Wire cutters are used to cut a hard wire and flexible beading wire and are one of the three basic tools that should be in every jewelry maker’s toolbox. Wire cutters designed specifically for jewelry making are superior to the tools available at the hardware store. Their blades are smaller and angled to make small, flush cuts on small-gauge wires.
INSTRUCTIONS
- 1. Look at both sides of your wire cutters. Notice that one side is flush (flat) and the other is slightly recessed.
- 2. Always place the flush side of your wire cutters as close as possible to the part of the wire that will be left on your piece.
- 3. This technique gives the closest cut and leaves the least amount of leftover wire.
Tech Tip
It is a good idea to have separate wire cutters for hard wire and flexible beading wire. Using hard wire cutters exclusively for cutting hard wire will keep the blades of the flexible beading wire cutters sharper longer.
You can read the previous entry (Chapter Four) in the series here. You can see the next entry (Glossary) in the series here.

 Beaded Jewelry – Chapter Four